It started with a very informal discussion with one of my mentors during a Photo-Walk. We were just discussing about an exhibition he was planning to host and complexities of digital manipulation in terms of color management and printing. This topic extended to get professional editing services for Photographs...
Showing posts with label Editing. Show all posts
Showing posts with label Editing. Show all posts
Monday, November 14, 2011
Wednesday, March 2, 2011
WORKSHOP ATTENDED on "Fashion Photography Redefined with Photoshop and Lightroom"
Fashion Photography Redefined with Photoshop and Lightroom
This workshop was conducted by a delhi based organization. In was a two days workshop focusing on Studio Set-up & Photographing Models on first day and processing these Photographs in Lightroom/Photoshop on second Day. I participated on second day of this workshop. Here was overall agenda for second day:
1. - Meaning of retouching for the commercial fashion photography Stages and logic of retouching. Not "how to do", but "what, when and why" to do.
2. - Basic tools and using of them
3. - Composition (framing and horizon correction)
4. - Brightness and contrast
5. - Basic filters
6. - Work with a human portrait: shape, plastic, basics of anatomy, filters "plastic" and shadow/highlights
7. - Work with skin: what to do before shoot, during a shoot, cooperation with make-up artist, correction in Photoshop
8. - Color correction - different ways
9. - Adjustment layers as a basic instrument of retouching
10. - Some other filters and using of them
11. - Texture layers
Trainers were from a well known Academy who trains Fashion Photographers in India and Europe !!!
Take-Away:
1. Get to know about the workflow they follow to edit a Fashion Photograph
a. Adjusting Lighting/Colors/White-Balance and Lens Distortions in Lightroom.
b. Enter into Photoshop for specific editing using Layers, Masks and various Filters.
*** They had very little knowledge of Lightroom and Photoshop is main tool for them
3. Popular tools of Photoshop used for Fashion Photo enhancements
a. Sharpen Brush
b. Blur Brush
c. Spot Healing
d. Gaussian Blur
e. Adjustment Layers (HSL, Levels, Brightness/Contrast)
4. There are different folks who do the editing. Photographers just shoot and pass the photographs to main editor. These Editors have good knowledge of specific tools which are used in their workflows. They are not Photoshop Experts and have fixed pattern to get best results!
THIS WORKSHOP GAVE ME A PERSPECTIVE HOW THESE PROFESSIONALS WORK !!! AND ANY CREATIVE PERSON WHO KNOW THESE TOOLS WELL, CAN DO FAR BETTER THAN TRAINERS I MET !!!
I was really disappointed when they were giving wrong theories about sRGB and AdobeRGB !
Now I know many of the folks who run workshops in Delhi and know about the quality of workshops they organize. In case you are planning to join any of the workshop in delhi, leave me a comment and I can try to find out if its worth for you or not... I don't want folks to waste money on such useless and over-hyped workshops !!! Sometimes they partner with big names like Nikon, Canon or Olympus... And have nice pages on Facebook !!!
So do proper research before enrolling for any Workshop
Wednesday, March 24, 2010
Ever Tried Adobe Camera Raw Dialog in Photoshop Elements for processing your RAW or JPEG files?
I love Adobe Camera Raw Adjustment controls in Photoshop Elements. Most of the times I use these controls to process my NEF and JPEG files. As you might know that Adobe Camera Raw dialog is used for processing/editing Camera Raw files generated by different SLR Cameras... Like Olympus, Canon, Nikon, Pentax etc... It supports files of different Cameras. To know more about this CLICK HERE...
Here I would share some information about different adjustment Controls in Adobe Cameara Dialog. I have chosen one image for applying different Adjustments. So note slider value for each control in first image and then compare the next images... I have tried to explain each adjustement control by its impact on image I have chosen...
Original File in Adobe Camera Raw Dialog... (Notice the state of all sliders...)
CLARITY Adjustment Control in Adobe Camera Raw Dialog of Photoshop Elements
This control sharpens the clarity of edges in the image. This process helps restore detail and sharpness that tonal adjustments may reduce. But you are seeing exactly opposite thing in above image. Here edges are very smooth because I have moved the slider to extreme left which softens all the edges... But this is what I like to apply for my images to get dreamy effect....
CONTRAST Adjustment Control in Adobe Camera Raw Dialog of Photoshop Elements
This control adjusts midtones in an image. Higher values increase the midtone contrast and lower values produce an image with less contrast. Generally use the Contrast slider to adjust the contrast of the midtones after setting the Exposure, Shadow and Brightness values.... Also it depends how you want to use these controls. In my case, when there are lot of dark areas in my photogrpahs and I want more details, I decrease contrast and it help in getting more details but of-course other controls need to be used intelligently...
SATURATION Adjustment Control in Adobe Camera Raw Dialog of Photoshop Elements
Saturation adjusts the color saturation of the image from –100 (pure monochrome) to +100 (double the saturation). In above Photograph I have decreased Saturation to -93 and you can see that its near to monochrome.. If you want vivid colors in your photographs move this slider towards right...
EXPOSURE Adjustment control in Adobe Camera Raw Dialog of Photoshop Elements
It controls the brightness or darkness of an image. Move the slider to the left to darken the image and move it to the right to brighten the image. The values are in increments equivalent to f‑stops. An adjustment of +1.50 is similar to widening the aperture one and one-half stops. Likewise, an adjustment of ‑1.50 is similar to reducing the aperture one and one-half stops... I assume you understand F-Stop which is used to control Aperute in Cameras..
FILL LIGHT Adjustment Control in Adobe Camera Raw Dialog of Photoshop Elements
This controls helps in recovering details from darker areas which we call shadows without brightening blacks. It can reconstruct some details from areas in which one or two color channels are clipped to black.So basically when you move this slider from left to right, it starts recovering details form darkest areas and start processing less dark area....Try out and you will understand.... Its very useful sometime when you have any dull image of any dark area.... In above image you can notice the change that details are available where we had dark spots...
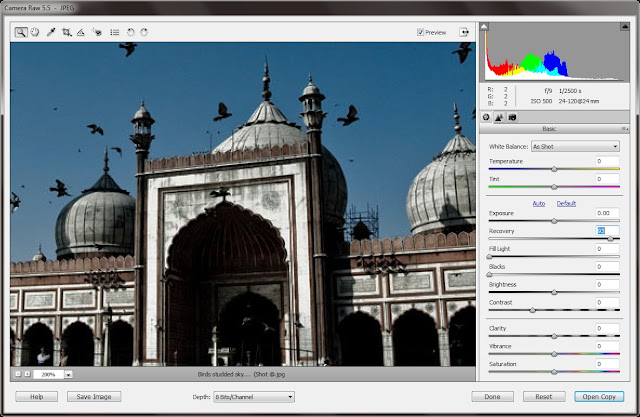
RECOVERY Adjustment Control in Adobe Camera Raw Dialog of Photoshop Elements
Recovery control, as the name tells it helps in recovering details from brighter areas technically called as highlights. It can reconstruct some details from areas in which one or two color channels are clipped to white. It works on highlights in similar fasion as Fill-Light works on Shadows...
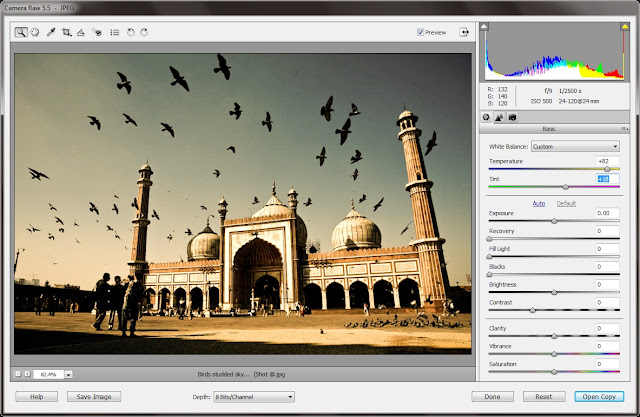
TEMPRATURE Adjustment control in Adobe Camera Raw Dialog of Photoshop Elements
Temperature helps in White Balance Adjustment for the Photographs. It adjusts white balance to a custom color temperature. Move the slider to the left to correct a photo taken at a lower color temperature of light: the plug‑in makes the image colors cooler (bluish shade) to compensate for the lower color temperature (yellowish shade) of the ambient light. Move the slider to the right for correcting a photo taken at a higher color temperature of light: the plug‑in makes the image colors warmer to compensate for the higher color temperature of the ambient light. Just play with this slider to get relevant colors if you feel above description a bit complex... Sometimes I use it to give attractive look to Photographs... As an example, I move the slider towards right in photos shot during Sunset.. It gives yellowish/redish shade to our photographs...
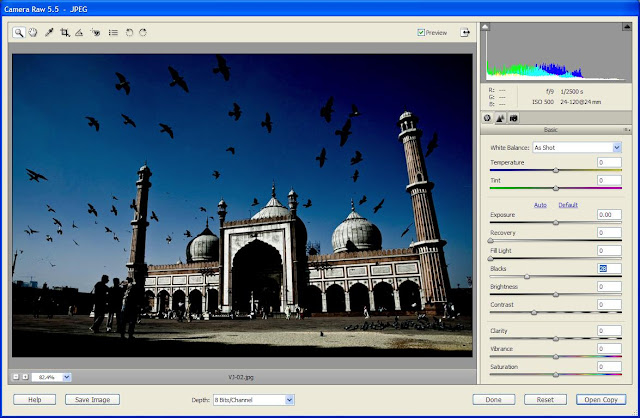
BLACKS adjustment control in Adobe Camera Raw Dialog of Photoshop Elements
This adjustment control tells which input levels are mapped to black in the final image. Increasing Blacks expands the areas that are mapped to black. This sometimes creates the appearance of increased contrast in the image. The greatest change is in the shadows with less change in the midtones and highlights.I use Blacks with Brightness.. I increase Blacks by increasing Brightness to get nice contrast in photograph with clean & bright depiction of main subject... But yes, it also depends upon the type of photograph you are processing. Obviously it will look bad if you are processing a Landscape... It works well for static subjects....
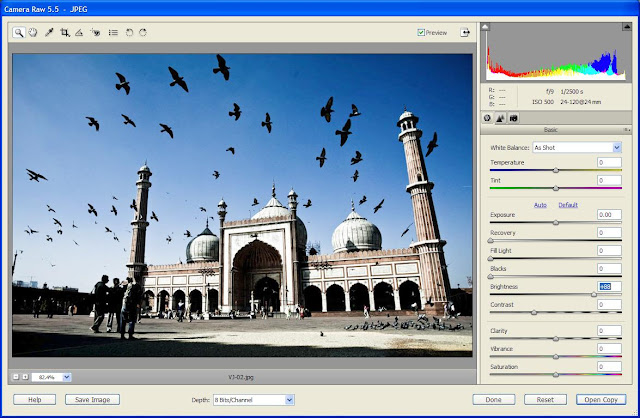
BRIGHTNESS adjustment control in Adobe Camera Raw Dialog of Photoshop Elements
It helps in controlling brightness of the image much as the Exposure slider does. In general, use the Brightness slider to adjust the overall brightness after you set the white and black clipping points with the Exposure and Shadow sliders...
Subscribe to:
Posts (Atom)


