Sunday, June 20, 2010

I have got a Gorrliapod :)

After getting it, I checked online reviews... I tried it with Nikon D90 with 80-200mm lens and its working amazingly fine for me :)

Saturday, June 12, 2010

Art of Simple Flash Portrait Photography : by Dom Bower

Today when I was watching some videos about Portrait photography, I came across this video which talks about simple ways to getting good results with very basic steps. Here Domm is starting with simple in-built flash with Program-mode of camera and switch to different placements of external flashes to get better results each time..

Watch this video and enjoy !!!

Sunday, May 23, 2010

Some basic tips about Macro Photography

Here is a small video which talks about Macro Photography and what all should be main consideration while shotting macro objects.

As we know MCRO/micro photography is about shooting very small objects. With normal lenses its very difficult because the are restricted from shooting objects from shorter distances which is main requirement of MACROs. Photographer needs a Macro lens or Extension Tubes for this purpose. Extension tubes are cheaper options which helps us using our standard lenses for shooting macro objects.


Even when we have Macro lenses and Extension tubes, there is challenge of getting nice Depth of field so that complete object is clear in final photograph. For that we need to shoot at low aperture which effectively means HIGH F value. Many lenses support F45 types for Macro shots. Since light will be low at F45, we need to shoot with slow shutter speed and TRIPOD would be must in that case.

Use Timer to avoid camera shake due to Click... For more details, watch this video...


Saturday, May 22, 2010

Rick Sammon's Top Ten Digital Photography Tips

After a Series of video by Karl Taylor, here is another video I watched where Rick Sammon talks about his ten tips about Digital Photography: I have described all these tips in my words my mixing my views, so watch original video for pure thoughts of Rick.

1. Learn How to see the Light :

 Light is more about Color, Highlights, Shadows and its Quality with respect to subject you are planning to Capture.

2. Create sense of Depth and Dimension

 Another thing which needs to be consider is dimensions of view you want to capture. By Dimensions he means horizonal distances, Vertical Distances and how far objects are placed.... All three sides which can be described as Height, Width and Distance...

3. Take a Hike !!! Take a walk and Take time before Shooting

Its very important to understand overall situation, so spend some time around the place and decide how you want to capture the moment/place.

4. Always look Down Back, Up

 When you are set to shoot, make sure about your placement to capture the moment in correct perspective.

5. Tell the Whole Story

Its a duty of Photographer to  capture any place or moment in such a way that final results tell that story to viewers.

6. Framing

Framing take a photograph to next level of Beauty. 
7. Be Aware of Background

Background is very important. Most of the times Photographers just think about main subject while shotting and ignore overall environment and background which is an integral part of photographs.
8. Fill the Frame

Watch the Video...
9. RAW Rules
10. Envision the End Result

Sunday, May 16, 2010

Natural Light Portraiture : By Karl Taylor

Here is another video by Karl Tayor where he explain about shooting People Portraits in Natural Light.

There are great tips in this video but I liked this one : "Its a complete Myth that Sun should be kept behind the Photographer so that Subject/Model is well Lit" : If you have the same myth in mind, watch out the video and you will be amazed by final results by Karl...

In this video, he is going to shoot a Model during Sunset behind her.


Karl has given 5 Tips about Natural Light Portraiture:

1. Communication with Model : Its always a good idea to regularly communicate with the Model to make her/him comfortable with overall setup of Photo-Shoot. This is very important for good finals...

2. Choice of Lens : Karl is using 85mm Lens on Full Frame Camera and describes this in detail... So watch the video below...

3. Choice of Aperture : Large Aperture is good for People Portraits. Karl is using 1.2 Lens but recommends Aperture between 1.8 to 2.8.

4. Lighting : First he started with the Photography Myth mentioned above and placed his Model in front of Sunset. Karl want to shoot into the SUN.This will give a nice backlit onto the Hair. Because light will be very less on face,  Fill in light with standard silver reflector will help in this case, but need to make sure that its not too harsh...

5. Environment...Location, soft background with shalow Depth of Field...

Watch out the video to know more from Karl about Natural Light Portraiture...

Saturday, May 15, 2010

Few Important Tip about Action Photography by KARL TAYLOR

As shared in last post, I am watching some Photography videos by Karl Taylor. 

Recently I checked his video about Action Photography, where he is demonstrating a Photography event for Bike racing. He is carrying two cameras, one with Telephoto and other with super-wide angel lens.

In this video we talks about Panning, Motion Capture apart from fast shutter speed to capture the moment. Accoring to Karl, its very important to capture the moment of action in any photograph and a sense about current action should always be there.

Panning is a photography technique in which your camera follow the moving object for sometime, which makes background blur with clear moving subject as still. Blur in background is gives the sense of motion. So it clearly meet the goal of capturing the subject with the sense of motion. Karl is standing just close to the track with wideangel lens on his camera. He is using Shutter Priority and trying to set Shutter speed to match with the speed of Bike... Before actually shooting, he tried some trial shots to set Exposure Compensation for Shutter Priority....

For more detailed and nice description watch this video:

Monday, May 10, 2010

Interesting Video on different types of Lights : "Photography Tips on Understanding Light" - Photography Tips by Karl Taylor

Few days back, I started viewing some Photography related videos on youtube and checked few videos by Karl Taylor

I am impressed with  this guy  and his videos are really helpful.  Personally I am learning a lot from these videos. Here I am sharing one video where he is talking about differenyt types of lights and a demo of shooting during sunset... he calls it Magic Hours...

He has classified light into four categories:

1. Transmitted Light
2. Soft Light
3. Hard Light
4. Reflected Light

and defined like: 

HARD LIGHT is Small light source like SUN on clear sky - Extremly bright having Hard edge shadows, String textures and Sparkles.

SOFT LIGHT is light coming from Large surface area like SUN behind cloud blanket : hardly any shadows... Incorrect usage of soft light may give dull results...

SUN-SET : "Magic Hour" ???

During this moment there is Soft light from Sky, Hard Light through Sun, Reflected light on water surface near sea shore and check out the video for more details....

has dmoed a photo-shoot during sunset on sea shore with superwide angel lens with 6-7 seconds of shutterspeed in Manual mode with small Aperture. ND Filters are used to balance lighter sky with darker foreground.

TIP : "Try to shoot 1/2 hr before OR after the Sunset to get better results"

After a small demo about sunset shoot, Karl talked about shooting people portraits using window light and a simple reflector. Check out this video and hope it will be helpful for you !!!

Wednesday, March 24, 2010

Ever Tried Adobe Camera Raw Dialog in Photoshop Elements for processing your RAW or JPEG files?


I love Adobe Camera Raw Adjustment controls in Photoshop Elements. Most of the times I use these controls to process my NEF and JPEG files. As you might know that Adobe Camera Raw dialog is used for processing/editing Camera Raw files generated by different SLR Cameras... Like Olympus, Canon, Nikon, Pentax etc... It supports files of different Cameras. To know more about this CLICK HERE...

Here I would share some information about different adjustment Controls in Adobe Cameara Dialog. I have chosen one image for applying different Adjustments. So note slider value for each control in first image and then compare the next images... I have tried to explain each adjustement control by its impact on image I have chosen...

I love Adobe Camera Raw Dialog in Photoshop Elements 8: Recovery:Attempts to recover details from highlights. Camera Raw can reconstruct some details from areas in which one or two color channels are clipped to white.Fill Light: Attempts to recover details from shadows, without brightening blacks. Camera Raw can reconstruct some details from areas in which one or two color channels are clipped to black. Using Fill Light is similar to using the shadows portion of the Photoshop Shadow/Highlight filter or the After Effects Shadow/Highlight effect. Blacks: Specifies which input levels are mapped to black in the final image. Increasing Blacks expands the areas that are mapped to black. This sometimes creates the appearance of increased contrast in the image. The greatest change is in the shadows, with less change in the midtones and highlights. Using the Blacks slider is similar to using the black point slider for input levels when using the Photoshop Levels command or the After Effects Levels effect.Brightness: Adjusts the brightness of the image, much as the Exposure slider does. However, instead of clipping the image in the highlights (areas that are completely white, with no detail) or shadows (areas that are completely black, with no detail), Brightness compresses the highlights and expands the shadows when you move the slider to the right. In general, use the Brightness slider to adjust the overall brightness after you set the white and black clipping points with the Exposure and Shadow sliders.Contrast: Adjusts the midtones in an image. Higher values increase the midtone contrast, and lower values produce an image with less contrast. Generally, use the Contrast slider to adjust the contrast of the midtones after setting the Exposure, Shadow, and Brightness values.Clarity: Sharpens the clarity of edges in the image. This process helps restore detail and sharpness that tonal adjustments may reduce.Vibrance: Adjusts the saturation so that clipping is minimized as colors approach full saturation, changing the saturation of all lower-saturated colors with less impact on the higher-saturated colors. Vibrance also prevents skin tones from becoming oversaturated. Saturation:Adjusts the color saturation of the image from –100 (pure monochrome) to +100 (double the saturation).
Original File in Adobe Camera Raw Dialog... (Notice the state of all sliders...)

I love Adobe Camera Raw Dialog in Photoshop Elements 8: Recovery:Attempts to recover details from highlights. Camera Raw can reconstruct some details from areas in which one or two color channels are clipped to white.Fill Light: Attempts to recover details from shadows, without brightening blacks. Camera Raw can reconstruct some details from areas in which one or two color channels are clipped to black. Using Fill Light is similar to using the shadows portion of the Photoshop Shadow/Highlight filter or the After Effects Shadow/Highlight effect. Blacks: Specifies which input levels are mapped to black in the final image. Increasing Blacks expands the areas that are mapped to black. This sometimes creates the appearance of increased contrast in the image. The greatest change is in the shadows, with less change in the midtones and highlights. Using the Blacks slider is similar to using the black point slider for input levels when using the Photoshop Levels command or the After Effects Levels effect.Brightness: Adjusts the brightness of the image, much as the Exposure slider does. However, instead of clipping the image in the highlights (areas that are completely white, with no detail) or shadows (areas that are completely black, with no detail), Brightness compresses the highlights and expands the shadows when you move the slider to the right. In general, use the Brightness slider to adjust the overall brightness after you set the white and black clipping points with the Exposure and Shadow sliders.Contrast: Adjusts the midtones in an image. Higher values increase the midtone contrast, and lower values produce an image with less contrast. Generally, use the Contrast slider to adjust the contrast of the midtones after setting the Exposure, Shadow, and Brightness values.Clarity: Sharpens the clarity of edges in the image. This process helps restore detail and sharpness that tonal adjustments may reduce.Vibrance: Adjusts the saturation so that clipping is minimized as colors approach full saturation, changing the saturation of all lower-saturated colors with less impact on the higher-saturated colors. Vibrance also prevents skin tones from becoming oversaturated. Saturation:Adjusts the color saturation of the image from –100 (pure monochrome) to +100 (double the saturation).
CLARITY Adjustment Control in Adobe Camera Raw Dialog of Photoshop Elements

    This control sharpens the clarity of edges in the image. This process helps restore detail and sharpness that tonal adjustments may reduce. But you are seeing exactly opposite thing in above image. Here edges are very smooth because I have moved the slider to extreme left which softens all the edges... But this is what I like to apply for my images to get dreamy effect....

I love Adobe Camera Raw Dialog in Photoshop Elements 8: Recovery:Attempts to recover details from highlights. Camera Raw can reconstruct some details from areas in which one or two color channels are clipped to white.Fill Light: Attempts to recover details from shadows, without brightening blacks. Camera Raw can reconstruct some details from areas in which one or two color channels are clipped to black. Using Fill Light is similar to using the shadows portion of the Photoshop Shadow/Highlight filter or the After Effects Shadow/Highlight effect. Blacks: Specifies which input levels are mapped to black in the final image. Increasing Blacks expands the areas that are mapped to black. This sometimes creates the appearance of increased contrast in the image. The greatest change is in the shadows, with less change in the midtones and highlights. Using the Blacks slider is similar to using the black point slider for input levels when using the Photoshop Levels command or the After Effects Levels effect.Brightness: Adjusts the brightness of the image, much as the Exposure slider does. However, instead of clipping the image in the highlights (areas that are completely white, with no detail) or shadows (areas that are completely black, with no detail), Brightness compresses the highlights and expands the shadows when you move the slider to the right. In general, use the Brightness slider to adjust the overall brightness after you set the white and black clipping points with the Exposure and Shadow sliders.Contrast: Adjusts the midtones in an image. Higher values increase the midtone contrast, and lower values produce an image with less contrast. Generally, use the Contrast slider to adjust the contrast of the midtones after setting the Exposure, Shadow, and Brightness values.Clarity: Sharpens the clarity of edges in the image. This process helps restore detail and sharpness that tonal adjustments may reduce.Vibrance: Adjusts the saturation so that clipping is minimized as colors approach full saturation, changing the saturation of all lower-saturated colors with less impact on the higher-saturated colors. Vibrance also prevents skin tones from becoming oversaturated. Saturation:Adjusts the color saturation of the image from –100 (pure monochrome) to +100 (double the saturation).
CONTRAST Adjustment Control in Adobe Camera Raw Dialog of Photoshop Elements

    This control adjusts midtones in an image. Higher values increase the midtone contrast and lower values produce an image with less contrast. Generally use the Contrast slider to adjust the contrast of the midtones after setting the Exposure, Shadow and Brightness values.... Also it depends how you want to use these controls. In my case, when there are lot of dark areas in my photogrpahs and I want more details, I decrease contrast and it help in getting more details but of-course other controls need to be used intelligently...

I love Adobe Camera Raw Dialog in Photoshop Elements 8: Recovery:Attempts to recover details from highlights. Camera Raw can reconstruct some details from areas in which one or two color channels are clipped to white.Fill Light: Attempts to recover details from shadows, without brightening blacks. Camera Raw can reconstruct some details from areas in which one or two color channels are clipped to black. Using Fill Light is similar to using the shadows portion of the Photoshop Shadow/Highlight filter or the After Effects Shadow/Highlight effect. Blacks: Specifies which input levels are mapped to black in the final image. Increasing Blacks expands the areas that are mapped to black. This sometimes creates the appearance of increased contrast in the image. The greatest change is in the shadows, with less change in the midtones and highlights. Using the Blacks slider is similar to using the black point slider for input levels when using the Photoshop Levels command or the After Effects Levels effect.Brightness: Adjusts the brightness of the image, much as the Exposure slider does. However, instead of clipping the image in the highlights (areas that are completely white, with no detail) or shadows (areas that are completely black, with no detail), Brightness compresses the highlights and expands the shadows when you move the slider to the right. In general, use the Brightness slider to adjust the overall brightness after you set the white and black clipping points with the Exposure and Shadow sliders.Contrast: Adjusts the midtones in an image. Higher values increase the midtone contrast, and lower values produce an image with less contrast. Generally, use the Contrast slider to adjust the contrast of the midtones after setting the Exposure, Shadow, and Brightness values.Clarity: Sharpens the clarity of edges in the image. This process helps restore detail and sharpness that tonal adjustments may reduce.Vibrance: Adjusts the saturation so that clipping is minimized as colors approach full saturation, changing the saturation of all lower-saturated colors with less impact on the higher-saturated colors. Vibrance also prevents skin tones from becoming oversaturated. Saturation:Adjusts the color saturation of the image from –100 (pure monochrome) to +100 (double the saturation).
SATURATION Adjustment Control in Adobe Camera Raw Dialog of Photoshop Elements

    Saturation adjusts the color saturation of the image from –100 (pure monochrome) to +100 (double the saturation). In above Photograph I have decreased Saturation to -93 and you can see that its near to monochrome.. If you want vivid colors in your photographs move this slider towards right...

I love Adobe Camera Raw Dialog in Photoshop Elements 8: Recovery:Attempts to recover details from highlights. Camera Raw can reconstruct some details from areas in which one or two color channels are clipped to white.Fill Light: Attempts to recover details from shadows, without brightening blacks. Camera Raw can reconstruct some details from areas in which one or two color channels are clipped to black. Using Fill Light is similar to using the shadows portion of the Photoshop Shadow/Highlight filter or the After Effects Shadow/Highlight effect. Blacks: Specifies which input levels are mapped to black in the final image. Increasing Blacks expands the areas that are mapped to black. This sometimes creates the appearance of increased contrast in the image. The greatest change is in the shadows, with less change in the midtones and highlights. Using the Blacks slider is similar to using the black point slider for input levels when using the Photoshop Levels command or the After Effects Levels effect.Brightness: Adjusts the brightness of the image, much as the Exposure slider does. However, instead of clipping the image in the highlights (areas that are completely white, with no detail) or shadows (areas that are completely black, with no detail), Brightness compresses the highlights and expands the shadows when you move the slider to the right. In general, use the Brightness slider to adjust the overall brightness after you set the white and black clipping points with the Exposure and Shadow sliders.Contrast: Adjusts the midtones in an image. Higher values increase the midtone contrast, and lower values produce an image with less contrast. Generally, use the Contrast slider to adjust the contrast of the midtones after setting the Exposure, Shadow, and Brightness values.Clarity: Sharpens the clarity of edges in the image. This process helps restore detail and sharpness that tonal adjustments may reduce.Vibrance: Adjusts the saturation so that clipping is minimized as colors approach full saturation, changing the saturation of all lower-saturated colors with less impact on the higher-saturated colors. Vibrance also prevents skin tones from becoming oversaturated. Saturation:Adjusts the color saturation of the image from –100 (pure monochrome) to +100 (double the saturation).
EXPOSURE Adjustment control in Adobe Camera Raw Dialog of Photoshop Elements

    It controls the brightness or darkness of an image. Move the slider to the left to darken the image and move it to the right to brighten the image. The values are in increments equivalent to f‑stops. An adjustment of +1.50 is similar to widening the aperture one and one-half stops. Likewise, an adjustment of ‑1.50 is similar to reducing the aperture one and one-half stops... I assume you understand F-Stop which is used to control Aperute in Cameras..

I love Adobe Camera Raw Dialog in Photoshop Elements 8: Recovery:Attempts to recover details from highlights. Camera Raw can reconstruct some details from areas in which one or two color channels are clipped to white.Fill Light: Attempts to recover details from shadows, without brightening blacks. Camera Raw can reconstruct some details from areas in which one or two color channels are clipped to black. Using Fill Light is similar to using the shadows portion of the Photoshop Shadow/Highlight filter or the After Effects Shadow/Highlight effect. Blacks: Specifies which input levels are mapped to black in the final image. Increasing Blacks expands the areas that are mapped to black. This sometimes creates the appearance of increased contrast in the image. The greatest change is in the shadows, with less change in the midtones and highlights. Using the Blacks slider is similar to using the black point slider for input levels when using the Photoshop Levels command or the After Effects Levels effect.Brightness: Adjusts the brightness of the image, much as the Exposure slider does. However, instead of clipping the image in the highlights (areas that are completely white, with no detail) or shadows (areas that are completely black, with no detail), Brightness compresses the highlights and expands the shadows when you move the slider to the right. In general, use the Brightness slider to adjust the overall brightness after you set the white and black clipping points with the Exposure and Shadow sliders.Contrast: Adjusts the midtones in an image. Higher values increase the midtone contrast, and lower values produce an image with less contrast. Generally, use the Contrast slider to adjust the contrast of the midtones after setting the Exposure, Shadow, and Brightness values.Clarity: Sharpens the clarity of edges in the image. This process helps restore detail and sharpness that tonal adjustments may reduce.Vibrance: Adjusts the saturation so that clipping is minimized as colors approach full saturation, changing the saturation of all lower-saturated colors with less impact on the higher-saturated colors. Vibrance also prevents skin tones from becoming oversaturated. Saturation:Adjusts the color saturation of the image from –100 (pure monochrome) to +100 (double the saturation).

FILL LIGHT Adjustment Control in Adobe Camera Raw Dialog of Photoshop Elements

    This controls helps in recovering details from darker areas which we call shadows without brightening blacks. It can reconstruct some details from areas in which one or two color channels are clipped to black.So basically when you move this slider from left to right, it starts recovering details form darkest areas and start processing less dark area....Try out and you will understand.... Its very useful sometime when you have any dull image of any dark area.... In above image you can notice the change that details are available where we had dark spots...

I love Adobe Camera Raw Dialog in Photoshop Elements 8: Recovery:Attempts to recover details from highlights. Camera Raw can reconstruct some details from areas in which one or two color channels are clipped to white.Fill Light: Attempts to recover details from shadows, without brightening blacks. Camera Raw can reconstruct some details from areas in which one or two color channels are clipped to black. Using Fill Light is similar to using the shadows portion of the Photoshop Shadow/Highlight filter or the After Effects Shadow/Highlight effect. Blacks: Specifies which input levels are mapped to black in the final image. Increasing Blacks expands the areas that are mapped to black. This sometimes creates the appearance of increased contrast in the image. The greatest change is in the shadows, with less change in the midtones and highlights. Using the Blacks slider is similar to using the black point slider for input levels when using the Photoshop Levels command or the After Effects Levels effect.Brightness: Adjusts the brightness of the image, much as the Exposure slider does. However, instead of clipping the image in the highlights (areas that are completely white, with no detail) or shadows (areas that are completely black, with no detail), Brightness compresses the highlights and expands the shadows when you move the slider to the right. In general, use the Brightness slider to adjust the overall brightness after you set the white and black clipping points with the Exposure and Shadow sliders.Contrast: Adjusts the midtones in an image. Higher values increase the midtone contrast, and lower values produce an image with less contrast. Generally, use the Contrast slider to adjust the contrast of the midtones after setting the Exposure, Shadow, and Brightness values.Clarity: Sharpens the clarity of edges in the image. This process helps restore detail and sharpness that tonal adjustments may reduce.Vibrance: Adjusts the saturation so that clipping is minimized as colors approach full saturation, changing the saturation of all lower-saturated colors with less impact on the higher-saturated colors. Vibrance also prevents skin tones from becoming oversaturated. Saturation:Adjusts the color saturation of the image from –100 (pure monochrome) to +100 (double the saturation).
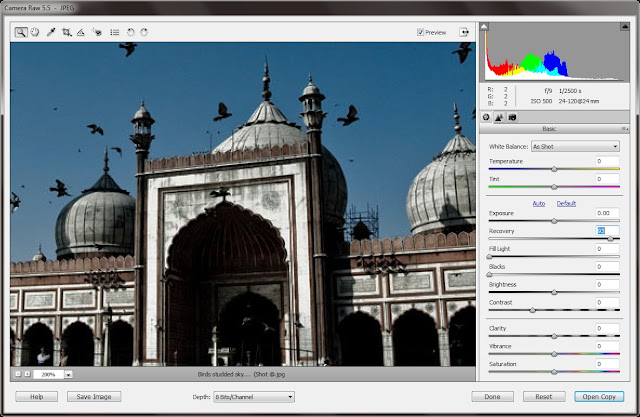
RECOVERY Adjustment Control in Adobe Camera Raw Dialog of Photoshop Elements

    Recovery control, as the name tells it helps in recovering details from brighter areas technically called as highlights. It can reconstruct some details from areas in which one or two color channels are clipped to white. It works on highlights in similar fasion as Fill-Light works on Shadows...

I love Adobe Camera Raw Dialog in Photoshop Elements 8: Recovery:Attempts to recover details from highlights. Camera Raw can reconstruct some details from areas in which one or two color channels are clipped to white.Fill Light: Attempts to recover details from shadows, without brightening blacks. Camera Raw can reconstruct some details from areas in which one or two color channels are clipped to black. Using Fill Light is similar to using the shadows portion of the Photoshop Shadow/Highlight filter or the After Effects Shadow/Highlight effect. Blacks: Specifies which input levels are mapped to black in the final image. Increasing Blacks expands the areas that are mapped to black. This sometimes creates the appearance of increased contrast in the image. The greatest change is in the shadows, with less change in the midtones and highlights. Using the Blacks slider is similar to using the black point slider for input levels when using the Photoshop Levels command or the After Effects Levels effect.Brightness: Adjusts the brightness of the image, much as the Exposure slider does. However, instead of clipping the image in the highlights (areas that are completely white, with no detail) or shadows (areas that are completely black, with no detail), Brightness compresses the highlights and expands the shadows when you move the slider to the right. In general, use the Brightness slider to adjust the overall brightness after you set the white and black clipping points with the Exposure and Shadow sliders.Contrast: Adjusts the midtones in an image. Higher values increase the midtone contrast, and lower values produce an image with less contrast. Generally, use the Contrast slider to adjust the contrast of the midtones after setting the Exposure, Shadow, and Brightness values.Clarity: Sharpens the clarity of edges in the image. This process helps restore detail and sharpness that tonal adjustments may reduce.Vibrance: Adjusts the saturation so that clipping is minimized as colors approach full saturation, changing the saturation of all lower-saturated colors with less impact on the higher-saturated colors. Vibrance also prevents skin tones from becoming oversaturated. Saturation:Adjusts the color saturation of the image from –100 (pure monochrome) to +100 (double the saturation).
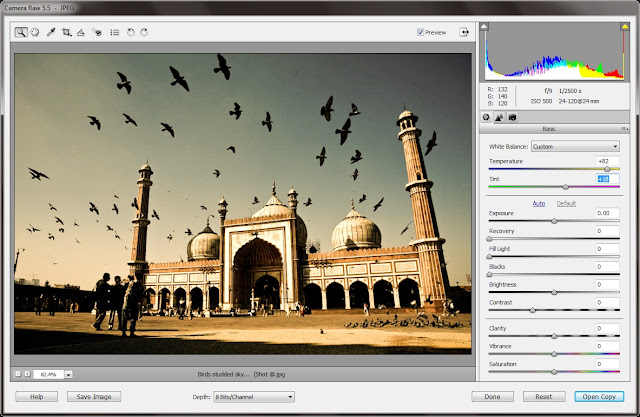
TEMPRATURE Adjustment control in Adobe Camera Raw Dialog of Photoshop Elements

    Temperature helps in White Balance Adjustment for the Photographs. It adjusts white balance to a custom color temperature. Move the slider to the left to correct a photo taken at a lower color temperature of light: the plug‑in makes the image colors cooler (bluish shade) to compensate for the lower color temperature (yellowish shade) of the ambient light. Move the slider to the right for correcting a photo taken at a higher color temperature of light: the plug‑in makes the image colors warmer to compensate for the higher color temperature of the ambient light. Just play with this slider to get relevant colors if you feel above description a bit complex... Sometimes I use it to give attractive look to Photographs... As an example, I move the slider towards right in photos shot during Sunset.. It gives yellowish/redish shade to our photographs...

I love Adobe Camera Raw Dialog in Photoshop Elements 8: Recovery:Attempts to recover details from highlights. Camera Raw can reconstruct some details from areas in which one or two color channels are clipped to white.Fill Light: Attempts to recover details from shadows, without brightening blacks. Camera Raw can reconstruct some details from areas in which one or two color channels are clipped to black. Using Fill Light is similar to using the shadows portion of the Photoshop Shadow/Highlight filter or the After Effects Shadow/Highlight effect. Blacks: Specifies which input levels are mapped to black in the final image. Increasing Blacks expands the areas that are mapped to black. This sometimes creates the appearance of increased contrast in the image. The greatest change is in the shadows, with less change in the midtones and highlights. Using the Blacks slider is similar to using the black point slider for input levels when using the Photoshop Levels command or the After Effects Levels effect.Brightness: Adjusts the brightness of the image, much as the Exposure slider does. However, instead of clipping the image in the highlights (areas that are completely white, with no detail) or shadows (areas that are completely black, with no detail), Brightness compresses the highlights and expands the shadows when you move the slider to the right. In general, use the Brightness slider to adjust the overall brightness after you set the white and black clipping points with the Exposure and Shadow sliders.Contrast: Adjusts the midtones in an image. Higher values increase the midtone contrast, and lower values produce an image with less contrast. Generally, use the Contrast slider to adjust the contrast of the midtones after setting the Exposure, Shadow, and Brightness values.Clarity: Sharpens the clarity of edges in the image. This process helps restore detail and sharpness that tonal adjustments may reduce.Vibrance: Adjusts the saturation so that clipping is minimized as colors approach full saturation, changing the saturation of all lower-saturated colors with less impact on the higher-saturated colors. Vibrance also prevents skin tones from becoming oversaturated. Saturation:Adjusts the color saturation of the image from –100 (pure monochrome) to +100 (double the saturation).
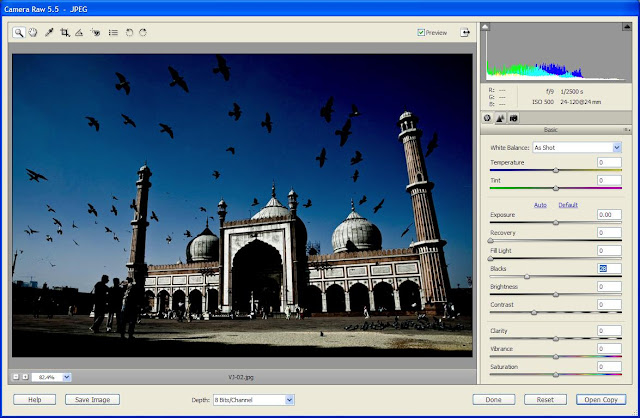
BLACKS adjustment control in Adobe Camera Raw Dialog of Photoshop Elements

    This adjustment control tells which input levels are mapped to black in the final image. Increasing Blacks expands the areas that are mapped to black. This sometimes creates the appearance of increased contrast in the image. The greatest change is in the shadows with less change in the midtones and highlights.I use Blacks with Brightness.. I increase Blacks  by increasing Brightness to get nice contrast in photograph with clean & bright depiction of main subject... But yes, it also depends upon the type of photograph you are processing. Obviously it will look bad if you are processing a Landscape... It works well for static subjects....

I love Adobe Camera Raw Dialog in Photoshop Elements 8: Recovery:Attempts to recover details from highlights. Camera Raw can reconstruct some details from areas in which one or two color channels are clipped to white.Fill Light: Attempts to recover details from shadows, without brightening blacks. Camera Raw can reconstruct some details from areas in which one or two color channels are clipped to black. Using Fill Light is similar to using the shadows portion of the Photoshop Shadow/Highlight filter or the After Effects Shadow/Highlight effect. Blacks: Specifies which input levels are mapped to black in the final image. Increasing Blacks expands the areas that are mapped to black. This sometimes creates the appearance of increased contrast in the image. The greatest change is in the shadows, with less change in the midtones and highlights. Using the Blacks slider is similar to using the black point slider for input levels when using the Photoshop Levels command or the After Effects Levels effect.Brightness: Adjusts the brightness of the image, much as the Exposure slider does. However, instead of clipping the image in the highlights (areas that are completely white, with no detail) or shadows (areas that are completely black, with no detail), Brightness compresses the highlights and expands the shadows when you move the slider to the right. In general, use the Brightness slider to adjust the overall brightness after you set the white and black clipping points with the Exposure and Shadow sliders.Contrast: Adjusts the midtones in an image. Higher values increase the midtone contrast, and lower values produce an image with less contrast. Generally, use the Contrast slider to adjust the contrast of the midtones after setting the Exposure, Shadow, and Brightness values.Clarity: Sharpens the clarity of edges in the image. This process helps restore detail and sharpness that tonal adjustments may reduce.Vibrance: Adjusts the saturation so that clipping is minimized as colors approach full saturation, changing the saturation of all lower-saturated colors with less impact on the higher-saturated colors. Vibrance also prevents skin tones from becoming oversaturated. Saturation:Adjusts the color saturation of the image from –100 (pure monochrome) to +100 (double the saturation).

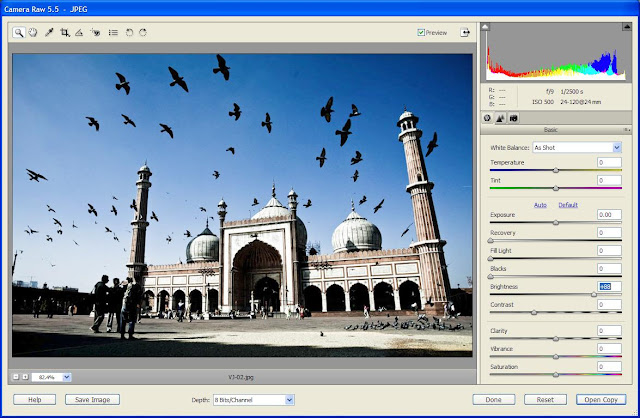
BRIGHTNESS adjustment control in Adobe Camera Raw Dialog of Photoshop Elements

    It helps in controlling brightness of the image much as the Exposure slider does. In general, use the Brightness slider to adjust the overall brightness after you set the white and black clipping points with the Exposure and Shadow sliders... 

Saturday, March 13, 2010

What is Stock Photography and what all a Photographer should focus for this?

Stock Photography is a modern way of generating revenues through your Photographs.On web there are many website where you can upload your good photographs with good resolution and find clients to use them by paying some amount. These websites charge some comission on sale and some may charge some fixed amount. So its very important to read all these conditions in advance for deciding the website you want to use for this. There are many Stock Photography sites these days like Fotolia, dinodia, Shutterstock, crestock etc. Just find out more and explore which is best for you.

Stock Photography, a way to generate revenues and clients on web don't care who you are, they are just concerned about the Photographs you have. So you need not to struggle for proving that you can do better than Professional Photographers in a particular area or other.


Its not a fast way to earn money and may take 5 Years to establish yourslef on these websites to earn decent money. And all this also needs significant time for shooting, editing and uploading. So need to give suffiecient time for this and with appropriate content as per market needs.


 Stock Photography needs market oriented Photographs with good compositions and creative ideas... Will add more on same blog about the areas one should focus for Stock Photography, in terms of genre, color compositions, resolutions etc...

Monday, February 8, 2010

How to keep the Photographer live inside yourself ???

Never ending motivation with high energy is very difficult to achieve. Many times, we come across many creative ideas but it is very difficult to execute all of them and, suddenly, a state arrives when we start feeling de-motivated because of lack of new ideas... This can happen in any walk of life and Photography is also the same kind of creative ark which needs a lot of inspiration to move ahead... 

What all can we do to keep a high energy level for our creative senses? 

 Actually, this  came to my mind when I opened my photographs and realized the lack of creative ideas for the past few months.. When I tried to find out the reason, there were many... But I don't want to know the reasons, I need a solution.. and here are few things I identified to follow in future to get the inspiration for Creative Photography.......

1. TRY TO HAVE YOUR CAMERA WITH YOU ALL THE TIME:

Many times I feel the need of camera while going to Office on Auto-Rikshaw, Cycle-Rikshaw OR going out in Trains or Buses.. Many times I find some interesting happenings around but fail to capture due to lack of camera as that moment...  

When this happens many times continuously, we stop noticing those small things that make a big difference in our society or the environment around us... This habit of ignoring interesting happenings leads to lack of Creativity... So a Camera is always helpful in improving your creative skills over time... We don't get good shots always but there is always a learning associated in terms of creativity or technical use of our equipment...

2.  EXPERIMENTS ARE A GOOD SOURCE OF LEARNINGS

Many times
, I go to different Monuments of the same kind in Delhi and shoot many photographs of the same kind. This is a big block for my creativity. Many times, am stuck in the same types of thoughts... We should try something new every time and if all goes wrong with new experiments, at least we know what went wrong and why.... Which will in turn improve our creative analytical skills... So we should take risks and try photographic styles/techniques we have never tried before....

Using different camera settings, Playing “What if…” game....
It is real fun to play with different compositions which may not be good in Photographic sense but you actually get to know why they are not good :-)

3. SET SMALL GOALS AND HAVE AN EYE ON FUTURE

Set small realistic goals and plan your photo-shoots. This requires a lot of discipline and patience.... so start with small goals and try your best to achieve those..

Evaluate your results from time to time but
always remember  your goal, your ideas and your photographs. Don’t let anyone discourage you... Any artist can develop a new methodology and any comments from others should always be welcome... Use these comments for improvements and don’t get discouraged by them....
                                                                                                              
4. GO TO PHOTO EXHIBITIONS AND PHOTOGRAPHERS
MEETS AROUND YOU

Its always a good idea to visit Exhibitions and other talks around Photography... on weekends I used to visit different places in Delhi like IHC to see other's work and other aspects of Exhibitions.. It also gives an
opportunity to analyze how people see these Photographs and what they actually want to see... What all they like or dislike and why...

Also it is a good idea to join some good groups on Facebook and see Photographs of friends from different geographical areas and different creative tastes...

5. LEARN AT EVERY MOMENT OF YOUR LIFE AND DEVELOP A THIRD CREATIVE EYE 

I have recently started reading books about art and photography.
And have also started reading about some Photo editing softwares. This helps me understanding other technical aspects of a Photograph.... I have also subscribed to newsletters, websites, Blogs and feeds.

In my office, there is a group of few Photographers who plan some outdoor shoots on weekends and this is really a real good opportunity to trigger new ideas, increasing our skill levels and boost our confidence...

6. VISIT NEW PLACES

We don’t have to go overseas to find something exciting to photograph or something very clean or organized. Exploring
neighborhood can give us fruitful results in terms of Photographs or learnings... These are actual Challenges... When we revisit those places through photographs, there is a different kind of enthusiasm...

7. DON'T FORGET REST OF THE WORLD

Taking proper rest is always necessary, so 
taking time out for other things is equally important... You may feel like Clicking Photographs every time but it is a different type of a charm to relax with family and friends without Camera...Chatting with your girl friend will help you chill out and feel fresh for the next shoot…and your girl friend will also be happy J

As a result, no one will frown when you take out your camera again...

8. USE YOUR MOBILE TO CAPTURE YOUR IDEAS IMMEDIATELY

It is always a good practice to utilize free time in productive thinking... Many times while travelling, or shopping we come across some good ideas about doing something in a better way.. but we forget those ideas when there is actual need of executing them.. The same is true with Photography... Many times, we see some interesting situations to capture but can't do that due to different reasons... So we should note those ideas somewhere and I think a mobile is the best gadget to achieve this.. We always keep our mobile phones with us and some of the new mobile phones provide a fairly advanced notepad to capture our ideas...

9. READ ABOUT GREAT PHOTOGRAPHERS AND THEIR ACHIEVEMENTS

Biographies and Photographs of some great Photographers can be a good source of inspiration. There can be many things to learn from their life, experiences, photographs. The Challenges they faced in terms of technology, infrastructure and the way they worked hard to achieve their goals can be very motivational. Their Photographs sometimes compels me to think about the time they clicked a particular photo and what all they must have done to do that...

I have compiled this list of to-dos after a lot of introspection and am learning new things every day. Will keep posting new things as I learn more. For now, I would like to conclude with a rather clichéd:

PHOTOGRAPHY IS FUN, ENJOY EVERY MOMENT OF IT...

Search This Blog

LinkWithin

Related Posts with Thumbnails