Showing posts with label Cameras. Show all posts

Friday, May 18, 2012

Simple Tips to decide your First DSLR !!!

1. Decide your Budget. (X)
2. Find out latest DSLR Models in the range of  0.8X - 0.9X (In the range of 20% less than your budget, because usually budget increases as you take final decision :) )
3. Think of Features you need and compare those features in Canon & Nikon or other brands you are looking for.
4. It should be enough for deciding, but following factor can further help in better decision for long-term.

- Lenses you may buy in future : prices, quality & which camera bodies support those.
- Post Sale service of different companies in your region.
- Value added services offered by dealer or Camera Manufacturer.

Thursday, January 5, 2012

Another Supermachine by Nikon is launched Today || Nikon D4, a 16 Megapixel Multi-Media SLR having speed of 10 Frames per Second

Just came across an article on dpreview.com about Nikon D4 - http://www.dpreview.com/news/2012/01/06/NikonD4launched

Detailed information about the Camera can of course be seen on the link shared. Here I would want to share quick highlights of this camera and our take on the pricing w.r.t. features this camera is offering.
Let's have a quick walk-through of main features Nikon D4 is offering -

1. 10 Frames per Second.
2. 16.2 Megapixel
3. Maximum ISO offered - ISO 204,800 (with boost) .. 12800.
4. First Camera to make use of XQD memory card format
6. EXCEED3 CMOS Sensor
7. 51-point AF with enhanced Speed.
8. Full HD Video Recording
9. In Build Time-Lapse Shooting mode which gives a processed movie in the end.
....

There are lot more things to share about this Camera, but let me stop here and check out the videos below. First one is about Nikon D4 tour and other one is comparison between D800 and D4...


Nikon D4 and D800...

Tuesday, September 27, 2011

Controlling Depth of Field while Photographying !!!


There are three basic facts to Depth Of Field. Holding everything else equal:

1. DOF increases as a lens is stopped down (i.e., the f/number is increased)


2. DOF increases as focal length decreases


3. DOF increases with subject distance.


Experienced photographers

Friday, May 29, 2009

Tips for Battery Power Conservation when you are out for long time like Trekking,,,

Last year I went for a Trek with Canon Rebel XT and I had no extra battery. It was five days trek and there was no option for charging the batteries, so I managed to conserve power for all five days. So I read a lot of links for power conservation before going for trek. Recently I was discussing about new plan for 8 days trekking in Kinnaur and realized that it will be very-2 difficult to use one battery for 7 days. I am still thinking of the options I can opt to manage this.

But here I wanted to share few tips for battery power conservation:


1. Think About Your Shot First:

Think about the shot’s value before getting the camera into action. You may find that a lot of the pretty things you normally would snap four images of without thinking, turn out to be scenes simply enjoyed without need for a picture. This step alone will save a lot of battery use indirectly by reducing the amount of times you want to get your camera out.

2. Turn Off Auto Focus:

This tip only works if you use a DSLR camera. Most point and shoots (P&S)don’t have a focus ring on the lens like DSLR lenses do. If you have a point and shoot, you don’t have much of a choice. But for those with DSLRs, using manual focus can be a huge power savings. Most cameras will start focusing when the shutter release is pressed down half way and will continue to focus until the shot is taken. And the larger the lens, the more power will be sucked from the battery to bring objects into focus.

3. Turn Off The Review Feature:

Both DSLR and P&S cameras have the ability to review a shot after the image is captured. While technology for screens is advancing and battery consumption is a prime concern (as well as clarity in sunshine) it’s still best to simply turn off the review feature.

4. If Your Camera Has A Viewfinder, Use It:

More and more DSLRs are being shipped with “live view”, popular on most all P&S cameras. But this can also be a huge power draw. For the same reason turning off the review feature saves energy, turning off “live view” and using the camera’s viewfinder can possibly save more power. Personally, I purchase P&S cameras that can still be used with just a view finder for this very reason. Constant display of what’s in front of the camera is not a wise use of battery power when running low. If your P&S does not have a viewfinder, allowing you to turn off the “live view” on the LCD during shooting, this tip may be of little help.

5. Image Stabilization:

Just like autofocus, the battery is drained from constantly moving elements around inside the lens to compensate for camera shake. It’s best left off, or only turned on for vital shots.

6. Off Your Camera When Not In Use:

I know this one sounds obvious, but many of us get in the habit of leaving our camera on and letting it power down automatically.

7. Don’t Transfer Pictures:

If you are accustom to using your camera to download photos to your computer, now might be a good time to think about bringing along a USB flash card reader. Downloading from your camera will surely suck down more power as most cameras don’t take advantage of the power capabilities.

8. Increase ISO To Lessen Flash Use:

Your flash can kill your batteries in no time flat. Depending on your camera’s capabilities, it may be a worthwhile option to increase the ISO a bit in marginal lighting situations to lessen the use of the built-in flash. Before your trip, or right now, do a few quick tests in moderate indoor lighting (the most likely scenario for flash use) to see just how far you can push the ISO before it doesn’t look good to you. This setting is purely subjective. If you can stand the grain at ISO400 on your camera, then go with it. Some cameras look horrid above ISO200. Don’t take someone else’s, or some website’s, word for it, try it out yourself and see what looks good to you. Flash use has been shown to reduce battery life by as much as 40%.

Tuesday, February 10, 2009

Appreciate the Camera you have :-)

Lots of times I have seen people dreaming about good equipments. Its not bad but one should focus on photography rather thinking about new cameras and gadgets.

All cameras have are essentially the same thing, a shutter that exposes light on a light-sensitive surface. Sure, there are differences in engineering tolerances and technical ranges and the latest technology. Remember old Photographers had not these gadgets and their work is outstanding...

"The real difference between an average photo and an amazing photo, is the photographer, not the camera."


Here’s how you can make your camera amazing. It just takes a little bit of work:-


1 Read your camera manual. If you don’t have it anymore, you can probably find it online. Learn every feature and aspect of the camera you have. It will take amazing pictures if you know how to use it properly.

2 Take your camera with you everywhere you go, and take lots of photos. Take photos of everything. Find something uninteresting and find a way to make it interesting. That is the essence of art.

3 Practice in manual mode. All cameras have a manual mode take a photo and change a single setting. Then change that one setting and take another photo. In my opinion this is the best way to understand the manipulation of light.

4 Make each photo count. One of the biggest downfalls of digital photography is the ability to take so many photos so easily for so little monetary investment. So we buy a cheap camera and snap away, hardly taking a thought to what is in the view finder. STOP! Think about your next photo, then take the time to make it amazing. You’ll start thinking like a photographer and your photos will improve ten fold.

5 Keep your best photos in a special place, discard the rest. Professional photographers take thousands of and show only their best to the client. Take photos for you, you are your own client. One day you’ll look back and be amazed at your work.

Thursday, November 6, 2008

My First Photography class

Today I had my first photography class where we discussed some basics on Photography and basic information about type of Cameras.

Diaphragm: A stop in the light path of a lens, having an aperture that regulates the amount of light that passes. These are actually blades which are moved to achieve a particular Aperture Value.

Shutter : Overlapping Curtains behind Lens to control the passage of light towards Sensor.

Types of Cameras:

1. Simple Viewfinder Cameras:

- Viewfinder: A viewfinder is what the photographer looks through to compose, and in many cases to focus, the picture.
- These Cameras have Parallax Error (Parallax is an apparent displacement or difference of orientation of an object viewed along two different lines of sight, and is measured by the angle or semi-angle of inclination between those two lines. KNOW MORE... )

2. Rangefinder Cameras: A rangefinder camera is a camera fitted with a rangefinder: a range-finding focusing mechanism allowing the photographer to measure the subject distance and take photographs that are in sharp focus. Most varieties of rangefinder show two images of the same subject, one of which moves when a calibrated wheel is turned; when the two images coincide and fuse into one, the distance can be read off the wheel. Older, non-coupled rangefinder cameras display the focusing distance and require the photographer to transfer the value to the lens focus ring; cameras without built-in rangefinders could have an external rangefinder fitted into the accessory shoe. Earlier cameras of this type had separate viewfinder and rangefinder windows; later the rangefinder was incorporated into the viewfinder. More modern designs have rangefinders coupled to the focusing mechanism, so that the lens is focused correctly when the rangefinder images fuse.

- Used these days : Leica ...
- Compact Cemaras
- Coupled range finder (Prizm) is used to reflect the view from lens for user eyes during capture process.
- Photographer needs to adjust the lens to get sharp image through these cameras.
- No noise, thats why used by Street Photographers
- Manual Adjustment Lenses are used in these kind of cameras

3. Twin-Lens Cameras: A twin-lens reflex camera (TLR) is a type of camera with two objective lenses of the same focal length. One of the lenses is the photographic objective (the lens that takes the picture), while the other is used for the waist-level viewfinder system. In addition to the objective, the viewfinder consists of a 45-degree mirror (the reason for the word reflex in the name), a matte focusing screen at the top of the camera, and a pop-up hood surrounding it. The two objectives are connected, so that the focus shown on the focusing screen will be exactly the same as on the film. However, many inexpensive TLRs are fixed-focus models. KNOW MORE...

- Paramender is used to overcome Parallax

4. Single Reflex Cameras (SLR): The single-lens reflex (SLR) camera uses an automatic moving mirror system which permits the photographer to see exactly what will be captured by the film or digital imaging system, as opposed to non-SLR cameras where the view through the viewfinder could be significantly different from what was captured on film. KNOW MORE...

- Mirror goes up when shoot button clicked.
- Mirror is used before shoot to show the view in viewfinder. So in this case light comes through lens and same view is also passed to Viewfinder.

5. View Cameras: It comprises a flexible bellows which forms a light-tight seal between two adjustable standards, one of which holds a lens, and the other a viewfinder or a photographic film holder.

The bellows is a flexible, accordion-pleated box, which encloses the space between the lens and film, and has the ability to flex to accommodate the movements of the standards. KNOW MORE...

- Huge Cameras
- Big film/Digital back sheet
- Always mounted on stand
- Lenses can be tilted
- Shutter is part of lens
- Companies like Sinar produces this kind of cameras. Check Google for other brands.

------------------------------------------------------------------------------------------------

* SMALL FORMAT Cameras:

- 35mm Format film cameras <36mm*24mm> 24+11mm = 35mm (Including perforation of 11 mm)
- 24mm*16mm sensors in small format digital cameras: Small format Digital SLRs : APS-C Format (Advanced Photo System) : D200,
- We should not compare Digtal Camera quality with Film cameras because of different reasons???

FULL FRAME CAMERAS:

- Nikon D3, D700
- Digital cameras with sensor 24mm*36mm

* LARGE FORMAT CAMERAS:

- 6'*9' inches & 8'*12' inches
- Sinar Brand cameras

* MEDIUM FORMAT CAMERAS

- 120 format, 220 format, 645 format (greater than 24mm*36mm frames)
- Mamiya (Japanese), Hasselblad
- 645 = 6*4.5 cm by Mamiya

Checkout Nikon D3 & Nikon D700

*** Today I saw a lens with Aperture Controls... Need to know about the details ***

Sunday, November 2, 2008

Digital Camera Comparison - MegaPixels

What are those megapixels anyway? Digital cameras capture photographs on image sensors, rather than on film.

The megapixel count is how many individual ‘dots’ are there on that image sensor, making up the photograph. 3 Megapixel cameras have 3 million dots on their sensors. 4 Megapixel cameras have 4 million dots . . . and so on.

You might assume then, that those extra million pixels will improve your digital photography. Not by much it won’t!

You would have to jump from a 3 megapixel to a 6 megapixel to really make a difference to your digital photography. (As compared to moving from 3MP to 4 MP... )


The reason I’m explaining this? When you are making your digital camera comparison, standing in the shop, ready to hand over your money – don’t concern yourself with whether camera ‘A’, has 1 million more pixels than camera ‘B’. It won't make a huge difference.

Other things to consider about the number of megapixels:

There are two things you should consider when making your digital camera comparison:

- How important is picture quality to you?
- How will you view your photographs, computer screen or print?

Picture quality:

This is determined by more than just the number of pixels. In fact, some cameras with a lot of megapixels produce worse pictures than cameras with fewer. The reason is twofold:

First, the more pixels crammed onto an image sensor, the smaller each individual pixel must be. The pixels are so small it’s difficult to accurately record the light hitting them. The results are what we call in digital photography ‘noise’ and ‘purple fringing’.

Second, the quality of lenses. The best sensor in the world will be useless without a good lens to focus light onto it. At the same time, a lesser sensor, but with a good lens in front of it is capable of taking very good photographs. Read about the importance of brand when making your digital camera comparison.

How will you view your photographs?:

If you plan to use digital photography to take photographs that you will only ever view on screen, then you won’t need many pixels. A standard 15” monitor will be 1024 pixels wide, and 768 pixels high. The total is only 0.8 Megapixels. No point buying a 6 megapixel camera if you only need 0.8 of them!

Maybe someday you'll want to print them out:

One day you may well decide to print the results of your digital photography. Most people do at some point, and therefore you’ll need to think carefully about the number of pixels when making your digital camera comparison.

The holy grail for printing is a resolution of 300 dots per inch. Click if you want to read more about image resolution. You will still get a good print from around 240 dots per inch though.

What does this mean for you in terms of megapixels? Have a look at the relationship below which shows how big a print you can realistically make:

MEGAPIXEL >>> QUALITY PRINT UPTO THIS SIZE

2MP >>> 6"*4"
3MP >>> 7"*5"
6MP >>> 10"*8"
8MP >>> 12"*10"

How SLR Cameras are better than Compact Cameras

SLRs are big, heavy and expensive when compared to compact digital cameras.

So wouldn’t you be better off with a compact? Well, not necessarily.

This page outlines the key differences between the two, and will hopefully show you that there are good reasons why keen photographers carry bulky SLRs around with them!

It’s difficult to pin down just one advantage of digital SLR cameras, because there are so many of them. Here are some them:

1. ADVANTAGE OF DIGITAL SLR CAMERAS: PHOTO QUALITY

Many compact cameras these days have a huge number of megapixels. More in fact than a lot of digital SLRs. You could be forgiven for thinking that this must mean better photos?

Unfortunately you’d be wrong. More megapixels doesn’t equal better quality. The problem is the image sensors on compact digital cameras are just too small. When 10 million pixels are crammed onto them the individual photosites on the sensor are too small, and too close together.

This closeness and their size means they suffer from interference. When you look at photos closely they have speckles on them. This is called digital noise. The effect is worse in low light.

The lack of noise in photos is one advantage of digital SLR cameras when it comes to picture quality, but not the only one. Another advantage is SLRs’ ability to shoot in RAW mode.

By shooting in RAW mode the camera captures more detail, and allows for far more flexibility when it comes to editing photos later on.

Overall photo quality is one advantage of digital SLR cameras over compact digital cameras.

2. ADVANTAGE OF DIGITAL SLR CAMERAS: SPEED

When I talk of “speed”, I am referring to the speed of camera operation.

There are a number of factors that contribute to the overall speed of a digital camera.

First, there is the speed of focusing. When composing a shot, cameras clearly need to focus first.

In any given situation a digital SLR camera will focus on the subject faster than a compact digital camera.


This speed advantage of digital SLR cameras is even more obvious in low light conditions.

Second, there is the frame rate. Frame rate is the number of frames per second a camera can take.

Digital SLR cameras are usually good at taking a sequence of photos of a moving subject; and will be able to keep re-focussing as the subject moves too. Have a look at the photo below to see the effect.

Another element of speed is how long the camera takes to switch on. With a digital SLR, especially the more recent Nikons and Canons, as soon as you turn the switch, it’s on. That’s it. No lens to extend. No motor whirring. It’s just on, in an instant.

If you are interested in capturing a moment, this “on” speed might be the difference between getting your shot, and missing out. This is a definite advantage of digital SLR cameras.

A final note on the speed of operation is the speed of zooming. When a compact camera zooms the motor whirrs and the lens slowly extends. Digital SLRs don’t work in this motorised way. You zoom the lens by turning the lens barrel. This gives you an instant zoom.

With this type of manual zooming it is also easier to nudge the zoom in or out a little if you need to – just a little flick of the wrist is all that’s needed, and you’re there.

Speed of operation is therefore a clear advantage of digital SLR cameras over compact digital cameras.

3. ADVANTAGE OF DIGITAL SLR CAMERA: FLEXIBILITY


With a digital SLR you have the choice of hundreds of different lenses and a huge range of flash options.

Why should you care about the lenses, after all, compact digital cameras come with good zoom lenses, don’t they? Well, yes, they do. But the quality of the lens is poor in relation to the lenses available to digital SLRs, and there is no comparison when it comes to aperture.

Lenses on digital SLRs have wide apertures, much wider than the zoom lenses on compacts. This provides two advantages of digital SLR cameras over compacts.

First, this means that shutter speeds can be faster because more light can enter the camera.

Second, it means you are able to control the depth of field in your photos. A shallow depth of field is particularly flattering in portrait photography, and is impossible to achieve with a compact camera because the lenses just aren’t up to the job.

And then there’s the flexibility of the flash on offer. The small flash on top of compact cameras is no match for the powerful flashguns that are available for digital SLRs.

Not only are flashguns more powerful, but they also able to “bounce” the flash off of ceilings and walls. This diffuses the flash, and eliminates red eye.

Thursday, June 12, 2008

What is Aperture in Cameras?


In optics, an aperture is a hole or an opening through which light is admitted. More specifically, the aperture of an optical system is the opening that determines the cone angle of a bundle of rays that come to a focus in the image plane. The aperture determines how collimated the admitted rays are, which is of great importance for the appearance at the image plane.

F-STOPS:

* F-stop: Focal length/Diameter of the selected aperture.
* F-stop: Bigger the number smaller the aperture, smaller the number bigger the aperture.
* With every opening of aperture by one full f-stop, amount of light coming in the camera becomes twice of the previous stop.

The aperture stop of a photographic lens can be adjusted to control the amount of light reaching the film or image sensor. In combination with variation of shutter speed, the aperture size will regulate the film's degree of exposure to light. Typically, a fast shutter speed will require a larger aperture to ensure sufficient light exposure, and a slow shutter speed will require a smaller aperture to avoid excessive exposure.

* Reducing the aperture size increases the depth of field, which describes the extent to which subject matter lying closer than or farther from the actual plane of focus appears to be in focus.
* In general, the smaller the aperture (the larger the number), the greater the distance from the plane of focus the subject matter may be while still appearing in focus.

Aperture priority is a semi-automatic shooting mode used in cameras. It allows the photographer to choose an aperture setting and allow the camera to decide the shutter speed and sometimes ISO sensitivity for the correct exposure. This is sometimes referred to as Aperture Priority Auto Exposure, A mode, Av mode, or semi-auto mode.

Prime lenses have a fixed focal length (FFL) and large aperture and are favored by professionals, especially by photojournalists who often work in dim light, have no opportunity to introduce supplementary lighting, and need to capture fast breaking events.

Zoom lenses typically have a maximum aperture (minimum f-number) of f/2.8 to f/6.3 through their range. A very fast zoom lens will be constant f/2.8 or f/2, which means the relative aperture will stay the same throughout the zoom range. A more typical consumer zoom will have a variable relative aperture, since it is harder and more expensive to keep the effective aperture proportional to focal length at long focal lengths; f/3.5 to f/5.6 is an example of a common variable aperture range in a consumer zoom lens.

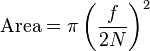
The amount of light captured by a lens is proportional to the area of the aperture, equal to:

\mathrm{Area} = \pi \left({f \over 2N}\right)^2
Where f is focal length and N is the f-number.

The focal length value is not required when comparing two lenses of the same focal length; a value of 1 can be used instead, and the other factors can be dropped as well, leaving area proportion to the reciprocal square of the f-number N..

If two cameras of different format sizes and focal lengths have the same angle of view, and the same aperture area, they gather the same amount of light from the scene. The relative focal-plane illuminance, however, depends only on the f-number N, independent of the focal length, so is less in the camera with the larger format, longer focal length, and higher f-number.

Search This Blog

LinkWithin

Related Posts with Thumbnails